Release Date: 15 April 2020
- The pygad.GA class accepts a new argument named
fitness_funcwhich accepts a function to be used for calculating the fitness values for the solutions. This allows the project to be customized to any problem by building the right fitness function.
Release Date: 4 May 2020
- The pygad.GA attributes are moved from the class scope to the instance scope.
- Raising an exception for incorrect values of the passed parameters.
- Two new parameters are added to the pygad.GA class constructor
(
init_range_lowandinit_range_high) allowing the user to customize the range from which the genes values in the initial population are selected. - The code object
__code__of the passed fitness function is checked to ensure it has the right number of parameters.
Release Date: 13 May 2020
- The fitness function accepts a new argument named
sol_idxrepresenting the index of the solution within the population. - A new parameter to the pygad.GA class constructor named
initial_populationis supported to allow the user to use a custom initial population to be used by the genetic algorithm. If not None, then the passed population will be used. IfNone, then the genetic algorithm will create the initial population using thesol_per_popandnum_genesparameters. - The parameters
sol_per_popandnum_genesare optional and set toNoneby default. - A new parameter named
callback_generationis introduced in the pygad.GA class constructor. It accepts a function with a single parameter representing the pygad.GA class instance. This function is called after each generation. This helps the user to do post-processing or debugging operations after each generation.
Release Date: 14 May 2020
- The
best_solution()method in the pygad.GA class returns a new output representing the index of the best solution within the population. Now, it returns a total of 3 outputs and their order is: best solution, best solution fitness, and best solution index. Here is an example:
solution, solution_fitness, solution_idx = ga_instance.best_solution()
print("Parameters of the best solution :", solution)
print("Fitness value of the best solution :", solution_fitness, "\n")
print("Index of the best solution :", solution_idx, "\n")- A new attribute named
best_solution_generationis added to the instances of the pygad.GA class. it holds the generation number at which the best solution is reached. It is only assigned the generation number after therun()method completes. Otherwise, its value is -1.Example:
print("Best solution reached after {best_solution_generation} generations.".format(best_solution_generation=ga_instance.best_solution_generation))- The
best_solution_fitnessattribute is renamed tobest_solutions_fitness(plural solution). - Mutation is applied independently for the genes.
Release Date: 17 May 2020
- Adding 2 extra modules (pygad.nn and pygad.gann) for building and training neural networks with the genetic algorithm.
Release Date: 18 May 2020
- The initial value of the
generations_completedattribute of instances from the pygad.GA class is0rather thanNone. - An optional bool parameter named
mutation_by_replacementis added to the constructor of the pygad.GA class. It works only when the selected type of mutation is random (mutation_type="random"). In this case, settingmutation_by_replacement=Truemeans replace the gene by the randomly generated value. IfFalse, then it has no effect and random mutation works by adding the random value to the gene. This parameter should be used when the gene falls within a fixed range and its value must not go out of this range. Here are some examples:
Assume there is a gene with the value 0.5.
If
mutation_type="random"andmutation_by_replacement=False,
then the generated random value (e.g. 0.1) will be added to the gene value. The new gene value is 0.5+0.1=0.6.
Ifmutation_type="random"andmutation_by_replacement=True,
then the generated random value (e.g. 0.1) will replace the gene value. The new gene value is 0.1.
Nonevalue could be assigned to themutation_typeandcrossover_typeparameters of the pygad.GA class constructor. WhenNone, this means the step is bypassed and has no action.
Release date: 1 June 2020
- A new module named
pygad.cnnis supported for building convolutional neural networks. - A new module named
pygad.gacnnis supported for training convolutional neural networks using the genetic algorithm. - The
pygad.plot_result()method has 3 optional parameters namedtitle,xlabel, andylabelto customize the plot title, x-axis label, and y-axis label, respectively. - The
pygad.nnmodule supports the softmax activation function. - The name of the
pygad.nn.predict_outputs()function is changed topygad.nn.predict(). - The name of the
pygad.nn.train_network()function is changed topygad.nn.train().
Release date: 5 July 2020
- A new parameter named
delay_after_genis added which accepts a non-negative number specifying the time in seconds to wait after a generation completes and before going to the next generation. It defaults to0.0which means no delay after the generation. - The passed function to the
callback_generationparameter of the pygad.GA class constructor can terminate the execution of the genetic algorithm if it returns the stringstop. This causes therun()method to stop.
One important use case for that feature is to stop the genetic algorithm
when a condition is met before passing though all the generations. The
user may assigned a value of 100 to the num_generations parameter of
the pygad.GA class constructor. Assuming that at generation 50, for
example, a condition is met and the user wants to stop the execution
before waiting the remaining 50 generations. To do that, just make the
function passed to the callback_generation parameter to return the
string stop.
Here is an example of a function to be passed to the
callback_generation parameter which stops the execution if the
fitness value 70 is reached. The value 70 might be the best possible
fitness value. After being reached, then there is no need to pass
through more generations because no further improvement is possible.
def func_generation(ga_instance):
 if ga_instance.best_solution()[1] >= 70:
return "stop"Release date: 19 July 2020
- 2 new optional parameters added to the constructor of the
pygad.GAclass which arecrossover_probabilityandmutation_probability.While applying the crossover operation, each parent has a random value generated between 0.0 and 1.0. If this random value is less than or equal to the value assigned to thecrossover_probabilityparameter, then the parent is selected for the crossover operation.For the mutation operation, a random value between 0.0 and 1.0 is generated for each gene in the solution. If this value is less than or equal to the value assigned to themutation_probability, then this gene is selected for mutation. A new optional parameter named
linewidthis added to theplot_result()method to specify the width of the curve in the plot. It defaults to 3.0.Previously, the indices of the genes selected for mutation was randomly generated once for all solutions within the generation. Currently, the genes' indices are randomly generated for each solution in the population. If the population has 4 solutions, the indices are randomly generated 4 times inside the single generation, 1 time for each solution.
Previously, the position of the point(s) for the single-point and two-points crossover was(were) randomly selected once for all solutions within the generation. Currently, the position(s) is(are) randomly selected for each solution in the population. If the population has 4 solutions, the position(s) is(are) randomly generated 4 times inside the single generation, 1 time for each solution.
A new optional parameter named
gene_spaceas added to thepygad.GAclass constructor. It is used to specify the possible values for each gene in case the user wants to restrict the gene values. It is useful if the gene space is restricted to a certain range or to discrete values.
Assuming that all genes have the same global space which include the
values 0.3, 5.2, -4, and 8, then those values can be assigned to the
gene_space parameter as a list, tuple, or range. Here is a list
assigned to this parameter. By doing that, then the gene values are
restricted to those assigned to the gene_space parameter.
gene_space = [0.3, 5.2, -4, 8]If some genes have different spaces, then gene_space should accept a
nested list or tuple. In this case, its elements could be:
- List, tuple, or range: It holds the individual gene space.
- Number (int/float): A single value to be assigned to the gene. This means this gene will have the same value across all generations.
None: A gene with its space set toNoneis initialized randomly from the range specified by the 2 parametersinit_range_lowandinit_range_high. For mutation, its value is mutated based on a random value from the range specified by the 2 parametersrandom_mutation_min_valandrandom_mutation_max_val. If all elements in thegene_spaceparameter areNone, the parameter will not have any effect.
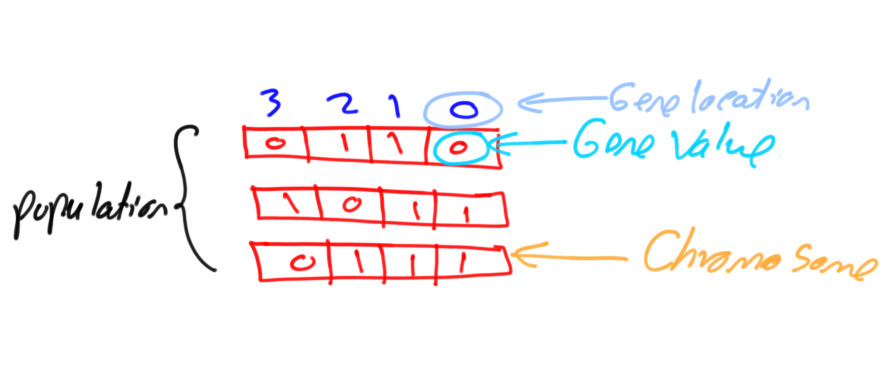
Assuming that a chromosome has 2 genes and each gene has a different
value space. Then the gene_space could be assigned a nested
list/tuple where each element determines the space of a gene. According
to the next code, the space of the first gene is [0.4, -5] which has 2
values and the space for the second gene is [0.5, -3.2, 8.8, -9] which
has 4 values.
gene_space = [[0.4, -5], [0.5, -3.2, 8.2, -9]]For a 2 gene chromosome, if the first gene space is restricted to the discrete values from 0 to 4 and the second gene is restricted to the values from 10 to 19, then it could be specified according to the next code.
gene_space = [range(5), range(10, 20)]If the user did not assign the initial population to the
initial_population parameter, the initial population is created
randomly based on the gene_space parameter. Moreover, the mutation
is applied based on this parameter.
Release Date: 6 August 2020
- A bug fix in assigning the value to the
initial_populationparameter. - A new parameter named
gene_typeis added to control the gene type. It can be eitherintorfloat. It has an effect only when the parametergene_spaceisNone. - 7 new parameters that accept callback functions:
on_start,on_fitness,on_parents,on_crossover,on_mutation,on_generation, andon_stop.
Release Date: 11 September 2020
- The
learning_rateparameter in thepygad.nn.train()function defaults to 0.01. - Added support of building neural networks for regression using the
new parameter named
problem_type. It is added as a parameter to bothpygad.nn.train()andpygad.nn.predict()functions. The value of this parameter can be either classification or regression to define the problem type. It defaults to classification. - The activation function for a layer can be set to the string
"None"to refer that there is no activation function at this layer. As a result, the supported values for the activation function are"sigmoid","relu","softmax", and"None".
To build a regression network using the pygad.nn module, just do the
following:
- Set the
problem_typeparameter in thepygad.nn.train()andpygad.nn.predict()functions to the string"regression". - Set the activation function for the output layer to the string
"None". This sets no limits on the range of the outputs as it will be from-infinityto+infinity. If you are sure that all outputs will be nonnegative values, then use the ReLU function.
Check the documentation of the pygad.nn module for an example that
builds a neural network for regression. The regression example is also
available at this GitHub
project:
https://github.com/ahmedfgad/NumPyANN
To build and train a regression network using the pygad.gann module,
do the following:
- Set the
problem_typeparameter in thepygad.nn.train()andpygad.nn.predict()functions to the string"regression". - Set the
output_activationparameter in the constructor of thepygad.gann.GANNclass to"None".
Check the documentation of the pygad.gann module for an example that
builds and trains a neural network for regression. The regression
example is also available at this GitHub
project:
https://github.com/ahmedfgad/NeuralGenetic
To build a classification network, either ignore the problem_type
parameter or set it to "classification" (default value). In this
case, the activation function of the last layer can be set to any type
(e.g. softmax).
Release Date: 11 September 2020
- A bug fix when the
problem_typeargument is set toregression.
Release Date: 14 September 2020
- Bug fix to support building and training regression neural networks with multiple outputs.
Release Date: 20 September 2020
- Support of a new module named
kerasgaso that the Keras models can be trained by the genetic algorithm using PyGAD.
The PyGAD library is available at PyPI at this page https://pypi.org/project/pygad. PyGAD is built out of a number of open-source GitHub projects. A brief note about these projects is given in the next subsections.
GitHub Link: https://github.com/ahmedfgad/GeneticAlgorithmPython
GeneticAlgorithmPython is the first project which is an open-source Python 3 project for implementing the genetic algorithm based on NumPy.
GitHub Link: https://github.com/ahmedfgad/NumPyANN
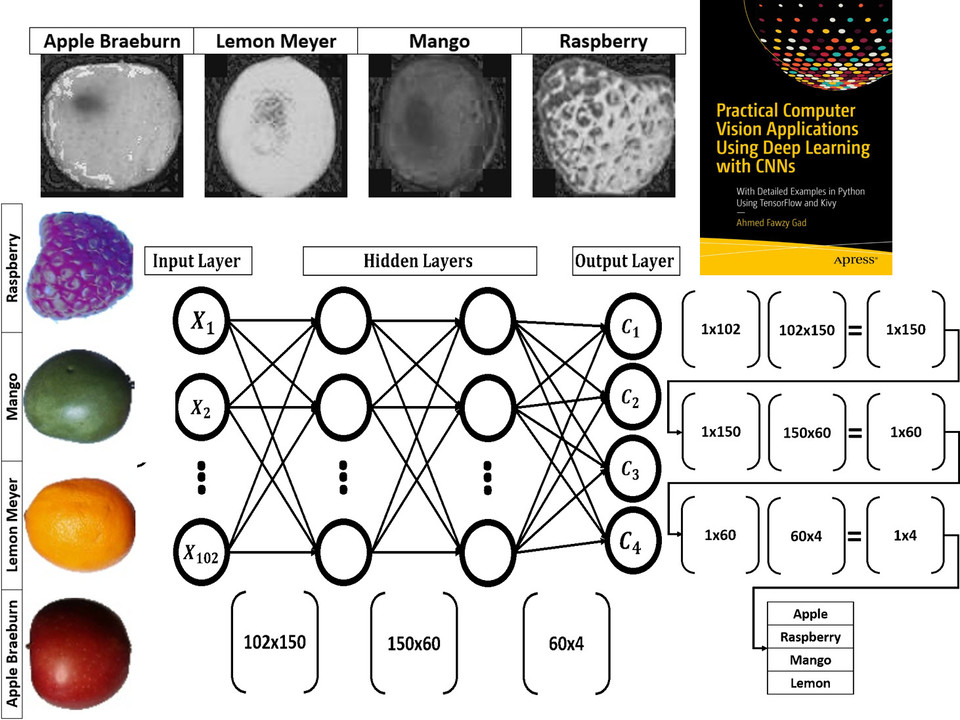
NumPyANN builds artificial neural networks in Python 3 using NumPy from scratch. The purpose of this project is to only implement the forward pass of a neural network without using a training algorithm. Currently, it only supports classification and later regression will be also supported. Moreover, only one class is supported per sample.
GitHub Link: https://github.com/ahmedfgad/NeuralGenetic
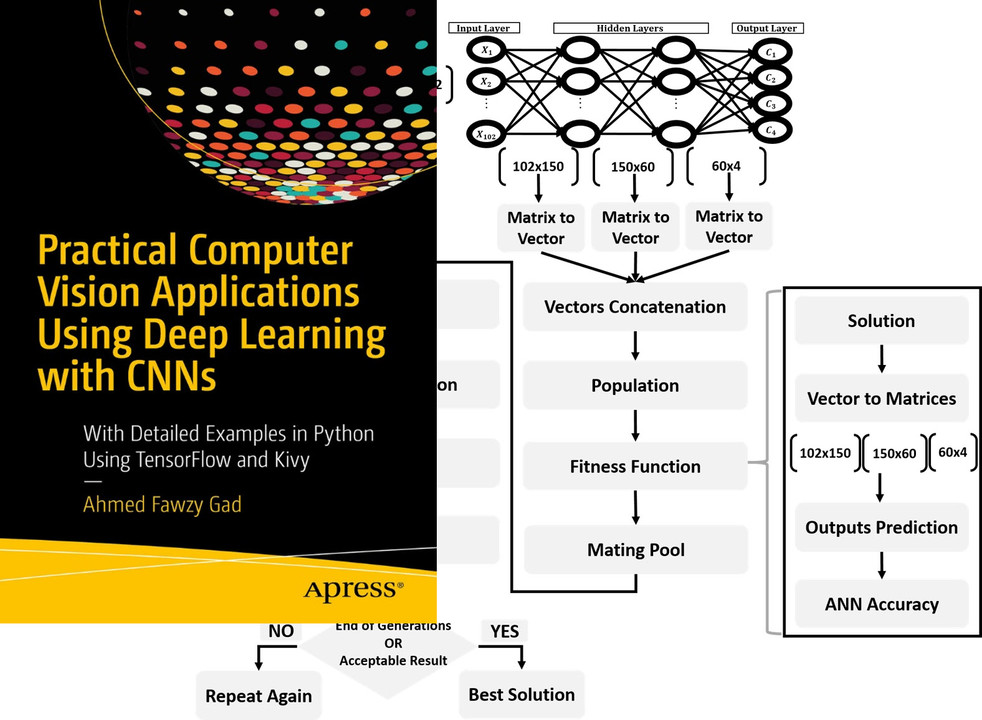
NeuralGenetic trains neural networks using the genetic algorithm based on the previous 2 projects GeneticAlgorithmPython and NumPyANN.
GitHub Link: https://github.com/ahmedfgad/NumPyCNN
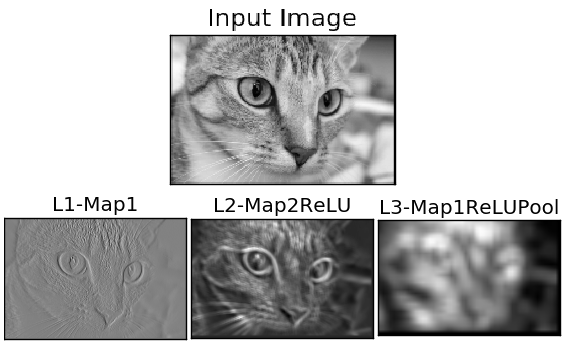
NumPyCNN builds convolutional neural networks using NumPy. The purpose of this project is to only implement the forward pass of a convolutional neural network without using a training algorithm.
GitHub Link: https://github.com/ahmedfgad/CNNGenetic
CNNGenetic trains convolutional neural networks using the genetic algorithm. It uses the GeneticAlgorithmPython project for building the genetic algorithm.
If there is an issue using PyGAD, then use any of your preferred option to discuss that issue.
One way is submitting an issue into this GitHub project (https://github.com/ahmedfgad/GeneticAlgorithmPython) in case something is not working properly or to ask for questions.
If this is not a proper option for you, then check the Contact Us section for more contact details.
PyGAD is actively developed with the goal of building a dynamic library for suporting a wide-range of problems to be optimized using the genetic algorithm.
To ask for a new feature, either submit an issue into this GitHub project (https://github.com/ahmedfgad/GeneticAlgorithmPython) or send an e-mail to ahmed.f.gad@gmail.com.
Also check the Contact Us section for more contact details.
If you created a project that uses PyGAD, then we can support you by mentioning this project here in PyGAD's documentation.
To do that, please send a message at ahmed.f.gad@gmail.com or check the Contact Us section for more contact details.
Within your message, please send the following details:
- Project title
- Brief description
- Preferably, a link that directs the readers to your project
There are different resources that can be used to get started with the genetic algorithm and building it in Python.
To start with coding the genetic algorithm, you can check the tutorial titled Genetic Algorithm Implementation in Python available at these links:
This tutorial is prepared based on a previous version of the project but it still a good resource to start with coding the genetic algorithm.

Get started with the genetic algorithm by reading the tutorial titled Introduction to Optimization with Genetic Algorithm which is available at these links:
Read about building neural networks in Python through the tutorial titled Artificial Neural Network Implementation using NumPy and Classification of the Fruits360 Image Dataset available at these links:
Read about training neural networks using the genetic algorithm through the tutorial titled Artificial Neural Networks Optimization using Genetic Algorithm with Python available at these links:
To start with coding the genetic algorithm, you can check the tutorial titled Building Convolutional Neural Network using NumPy from Scratch available at these links:
This tutorial) is prepared based on a previous version of the project but it still a good resource to start with coding CNNs.
Get started with the genetic algorithm by reading the tutorial titled Derivation of Convolutional Neural Network from Fully Connected Network Step-By-Step which is available at these links:
You can also check my book cited as Ahmed Fawzy Gad 'Practical Computer Vision Applications Using Deep Learning with CNNs'. Dec. 2018, Apress, 978-1-4842-4167-7 which discusses neural networks, convolutional neural networks, deep learning, genetic algorithm, and more.
Find the book at these links:
