Free Image Hosting solution, Flickr/imgur alternative. Using Cloudflare Pages and the Telegram Bot API (Telegram Channel).
English|中文
Important
Since the original Telegraph API interface was closed by the official, you need to switch the upload channel to Telegram Channel. Please set TG_Bot_Token and TG_Chat_ID according to the deployment requirements in the documentation, otherwise the upload function will not work properly.
If you don't have a Telegram account yet, please create one first. Then, follow these steps to get the BOT_TOKEN and CHAT_ID:
- Get the
Bot_Token- In Telegram, send the command
/newbotto @BotFather, and follow the prompts to input your bot's name and username. Once successfully created, you will receive aBOT_TOKEN, which is used to interact with the Telegram API.
- In Telegram, send the command

- Set the bot as a channel administrator
- Create a new channel (Channel), enter the channel and select channel settings. Add the bot you just created as a channel administrator, so it can send messages.


-
Get the
Chat_ID- Get your channel ID through @VersaToolsBot. Send a message to this bot and follow the instructions to receive your
CHAT_ID(the ID of your channel). - Or get your channel ID through @GetTheirIDBot. Send a message to this bot and follow the instructions to receive your
CHAT_ID(the ID of your channel).

- Get your channel ID through @VersaToolsBot. Send a message to this bot and follow the instructions to receive your

Finally, go to the Cloudflare Pages backend to set the relevant environment variables (Note: After modifying environment variables, you need to redeploy for the changes to take effect)
| Environment Variable | Example Value | Description |
|---|---|---|
TG_Bot_Token |
123468:AAxxxGKrn5 |
Telegram Bot Token obtained from @BotFather. |
TG_Chat_ID |
-1234567 |
Channel ID, ensure the TG Bot is an administrator of the channel or group. |
The only thing you need to prepare in advance is a Cloudflare account (If you need to deploy on your own server without relying on Cloudflare, please refer to #46)
3 simple steps to deploy this project and have your own image hosting
-
Fork this repository (Note: You must deploy using Git or Wrangler CLI tool for it to work properly, Documentation)
-
Open the Cloudflare Dashboard, enter the Pages management page, select Create Project, then choose
Connect to Git provider
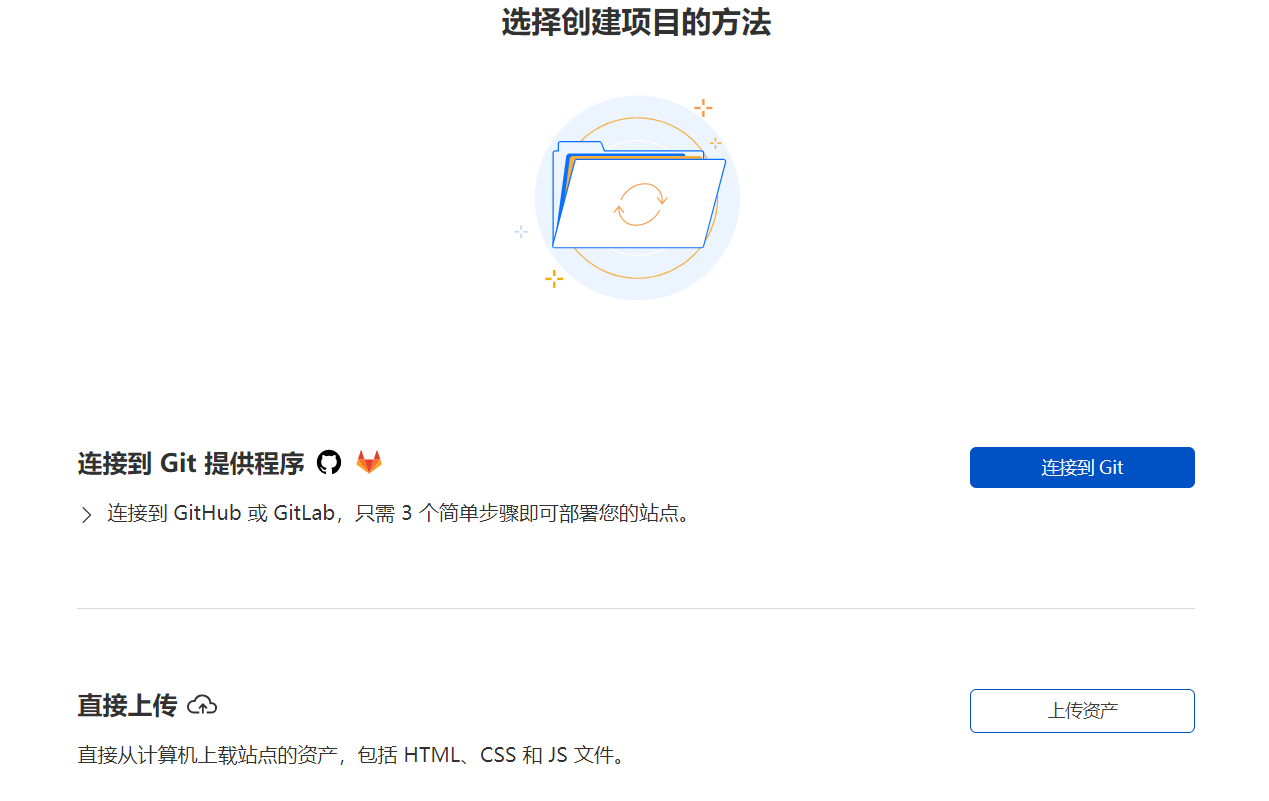
- Follow the prompts on the page to enter the project name, select the git repository you need to connect to, then click
Deploy siteto complete the deployment
-
Unlimited image storage, you can upload an unlimited number of images
-
No need to purchase a server, hosted on Cloudflare's network. When usage does not exceed Cloudflare's free quota, it's completely free
-
No need to purchase a domain name, you can use the free second-level domain
*.pages.devprovided by Cloudflare Pages, and also supports binding custom domain names -
Supports image review API, can be enabled as needed. When enabled, inappropriate images will be automatically blocked and no longer loaded
-
Supports backend image management, allowing you to preview uploaded images online, add to whitelist, blacklist, and other operations
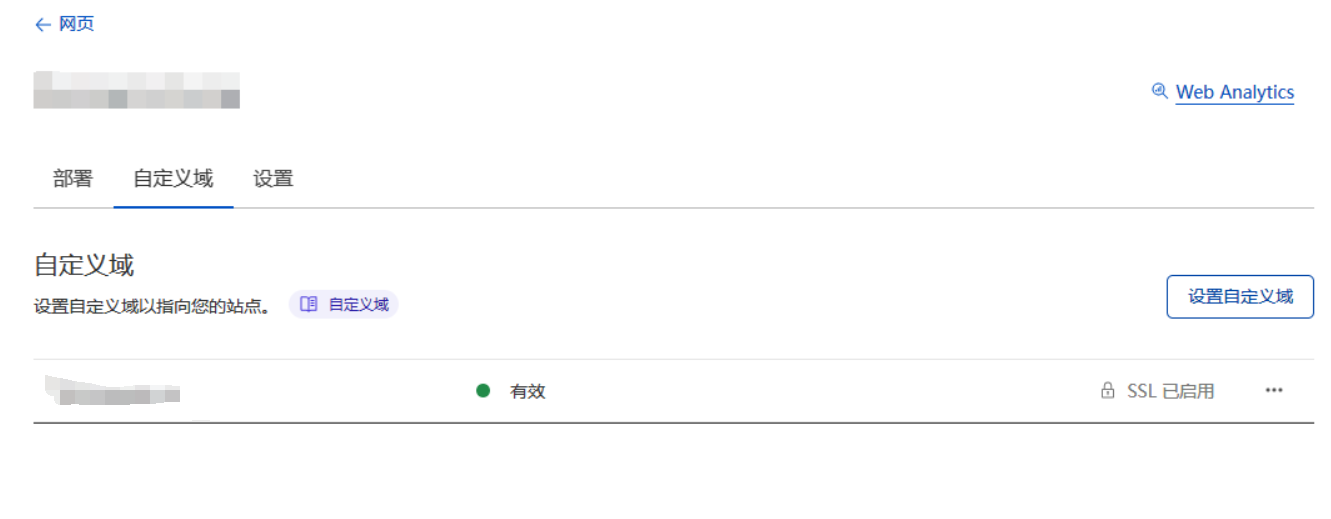
In the custom domain section of Pages, bind a domain name that exists in Cloudflare. For domain names hosted in Cloudflare, DNS records will be automatically modified
-
Please go to https://moderatecontent.com/ to register and get a free API key for reviewing image content
-
Open the Cloudflare Pages management page, click
Settings,Environment Variables,Add Environment Variablesin sequence -
Add a
variable nameasModerateContentApiKey,valueas theAPI keyyou just obtained in step 1, then clickSave
Note: Since the changes will take effect on the next deployment, you may also need to go to the Deployments page and redeploy the project
After enabling image review, the first image load will be slow because review takes time. Subsequent image loads will not be affected due to caching

-
Uploaded images are sent via the Telegram Bot API and stored on Telegram's servers. Telegram currently limits files sent by bots to a maximum size of 50MB per file; uploads larger than this will fail
-
Due to the use of Cloudflare's network, image loading speed may not be guaranteed in some regions
-
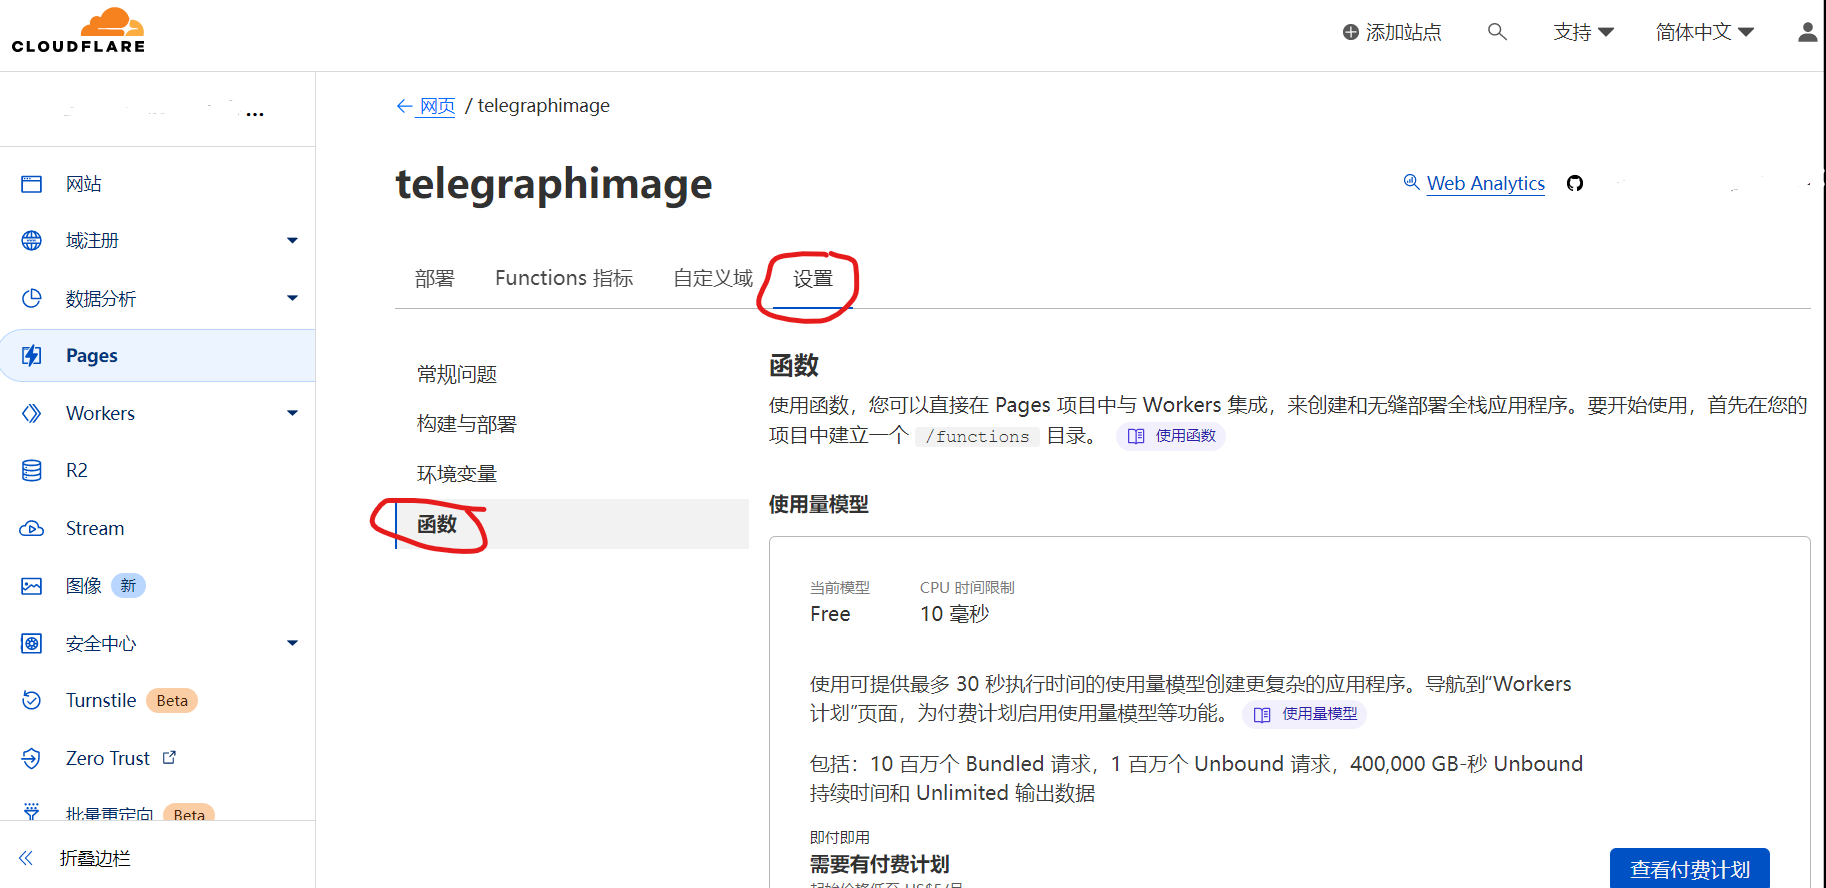
The free version of Cloudflare Function is limited to 100,000 requests per day (i.e., the total number of uploads or image loads cannot exceed 100,000). If exceeded, you may need to purchase the paid plan of Cloudflare Function. If image management is enabled, there will also be limitations on KV operation count, and you may need to purchase the paid plan if exceeded
Ideas and code provided by Hostloc @feixiang and @乌拉擦
July 6, 2024 - Backend Management Page Update
-
Support for two new management page views (Grid view and Waterfall view)
- Grid view, thanks to @DJChanahCJD for the submitted code
Supports batch delete/copy links
Supports sorting in reverse chronological order
Supports pagination
- Waterfall view, thanks to @panther125 for the submitted code
- Grid view, thanks to @DJChanahCJD for the submitted code
Supports batch delete/copy links
Supports sorting in reverse chronological order
Supports pagination
-
Added automatic update support
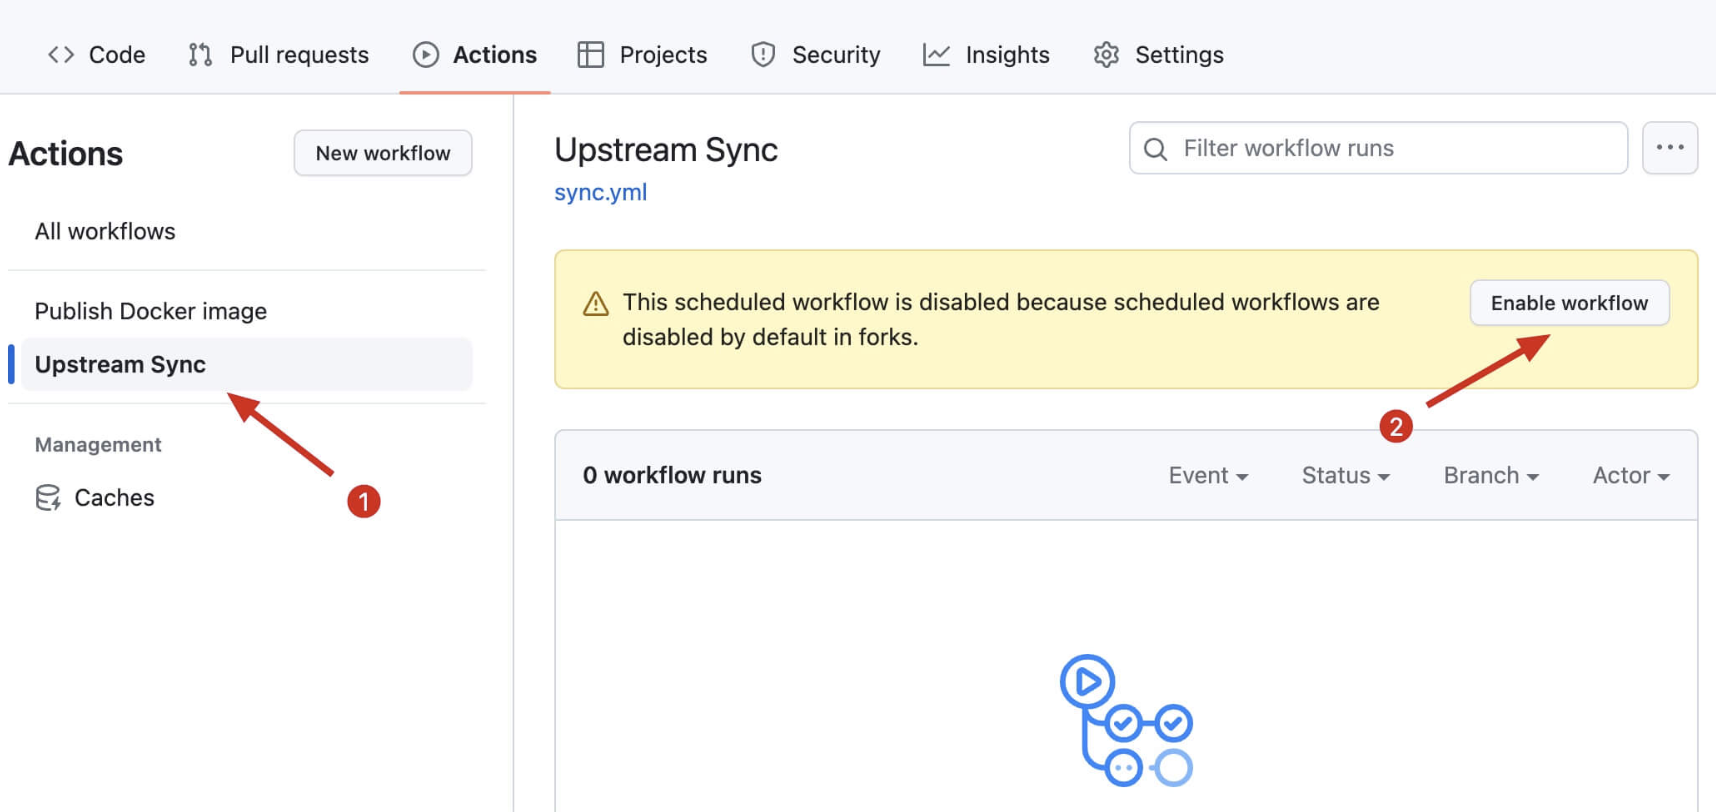
Now forked projects can automatically sync with the upstream repository to automatically install the latest project features, thanks to @bian2022
Steps to enable automatic updates: After you fork the project, due to Github's limitations, you need to manually go to the Actions page of your forked project to enable Workflows, and enable Upstream Sync Action. Once enabled, automatic updates will occur hourly:
If you encounter Upstream Sync execution errors, please manually Sync Fork once!Manually update code
If you want to manually update immediately, you can check Github's documentation to learn how to sync your forked project with upstream code.
You can star/watch this project or follow the author to receive notifications of new feature updates.
-
Added remote telemetry
You can opt out of telemetry by adding the
disable_telemetryenvironment variable

January 18, 2023 - Image Management Feature Update
- Support for image management feature, disabled by default. To enable, after deployment, go to the backend and click
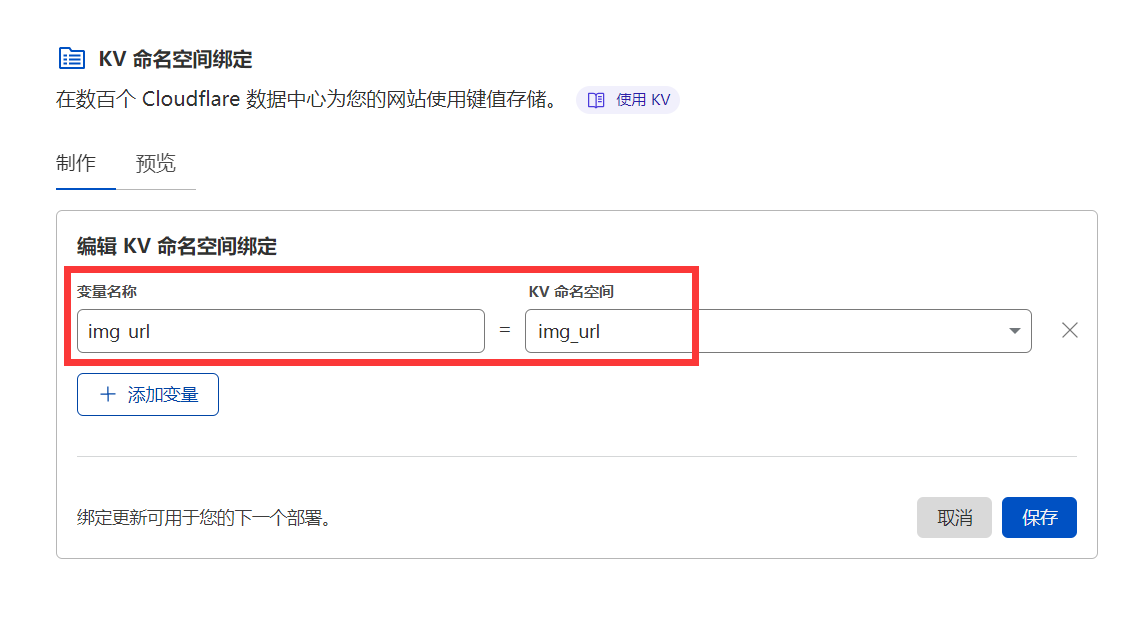
Settings->Functions->KV Namespace Bindings->Edit Bindings->Variable Nameenter:img_urlKV Namespaceselect the KV storage space you created in advance. After enabling, visit http(s)://your-domain/admin to open the backend management page | Variable Name | KV Namespace | | ----------- | ----------- | | img_url | Select the KV storage space created in advance |
- The backend management page has a new login verification feature, also disabled by default. To enable, after deployment, go to the backend and click
Settings->Environment Variables->Define variables for production->Edit variablesand add the variables shown in the table below to enable login verification | Variable Name | Value | | ----------- | ----------- | |BASIC_USER = | | |BASIC_PASS = | |
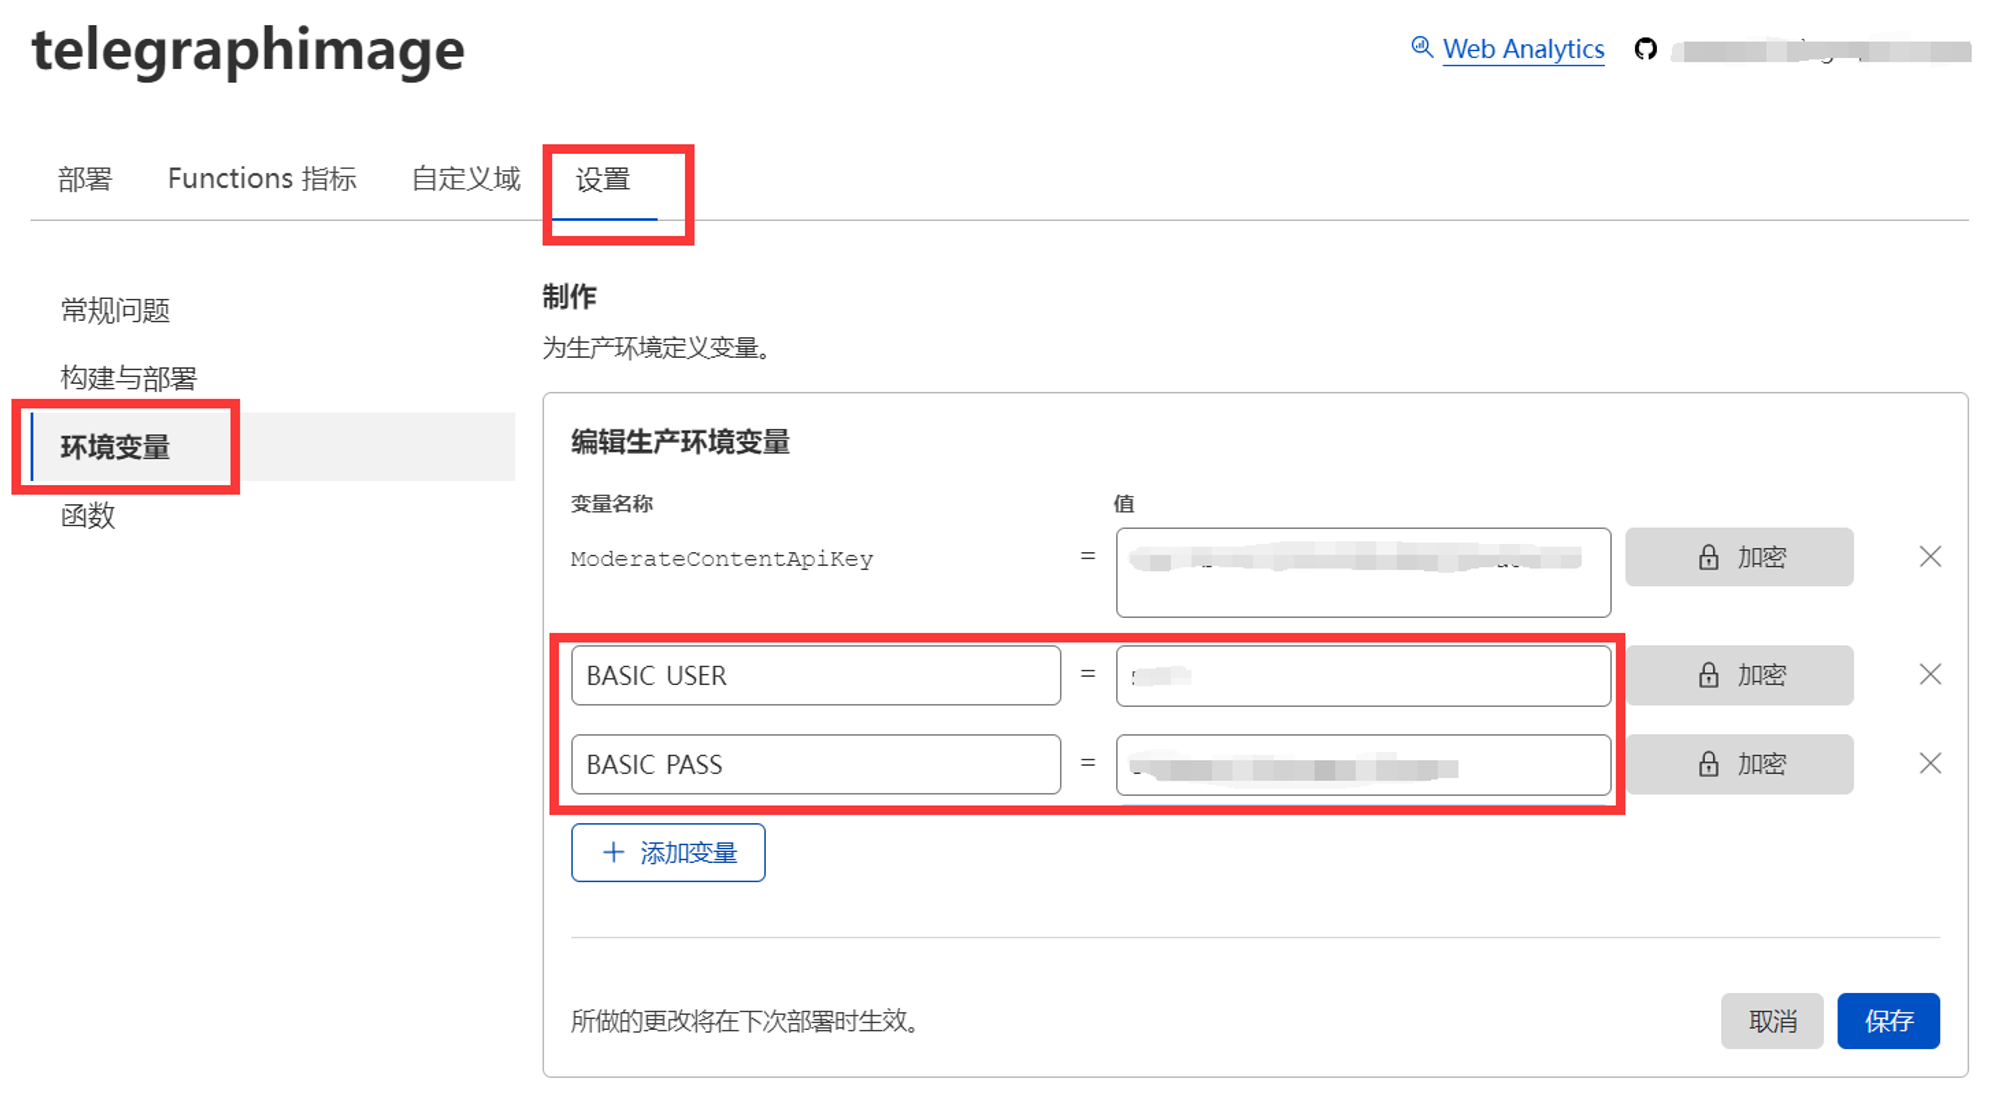
Of course, you can also choose not to set these two values, so that accessing the backend management page will not require verification and will skip the login step directly. This design allows you to use it in combination with Cloudflare Access to achieve email verification code login, Microsoft account login, Github account login, and other functions. It can be integrated with the existing login method on your domain without having to remember another set of backend credentials. For adding Cloudflare Access, please refer to the official documentation. Note that the protected path needs to include /admin and /api/manage/*
- Added image total count statistics When the image management feature is enabled, you can view the number of images in the record at the top of the backend
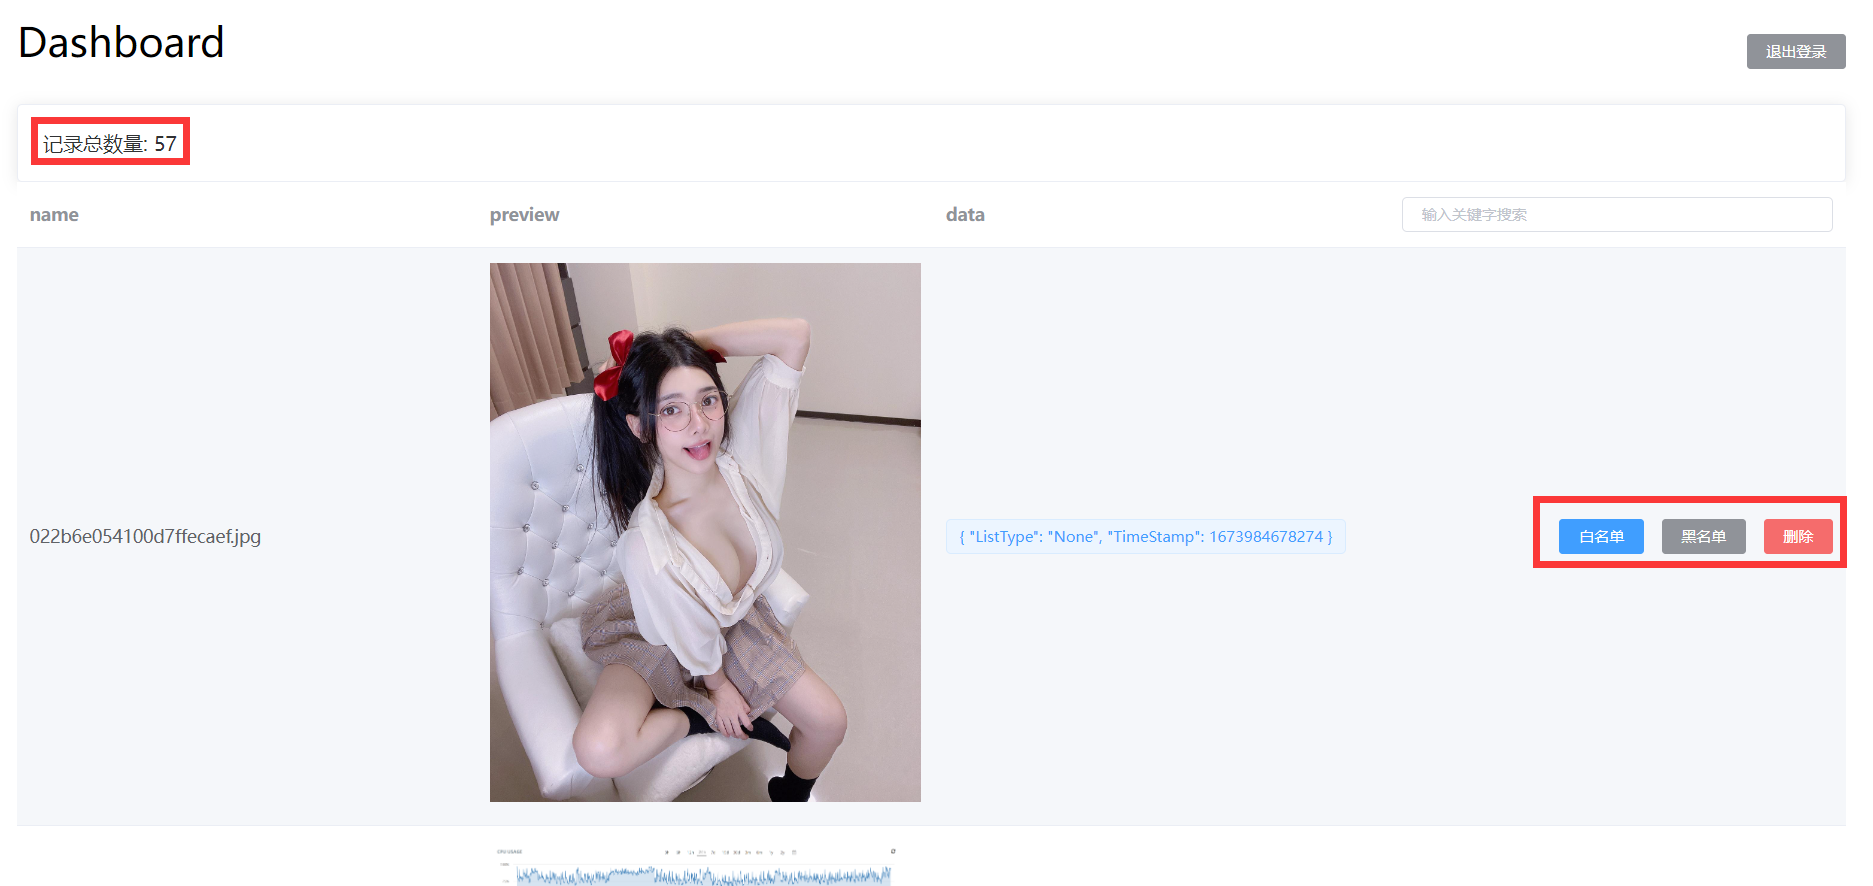
- Added image filename search When the image management feature is enabled, you can use the image filename in the backend search box to quickly search and locate the images you need to manage

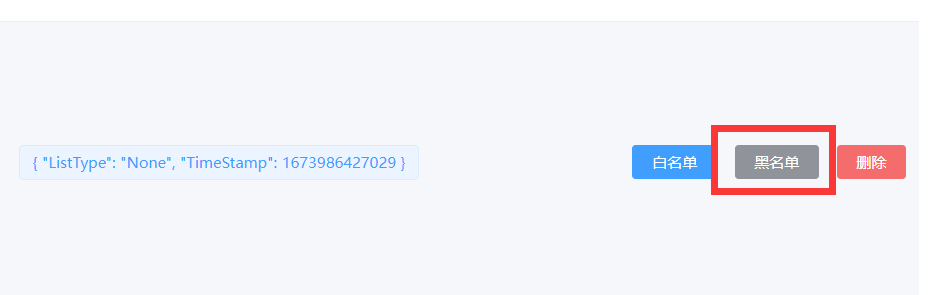
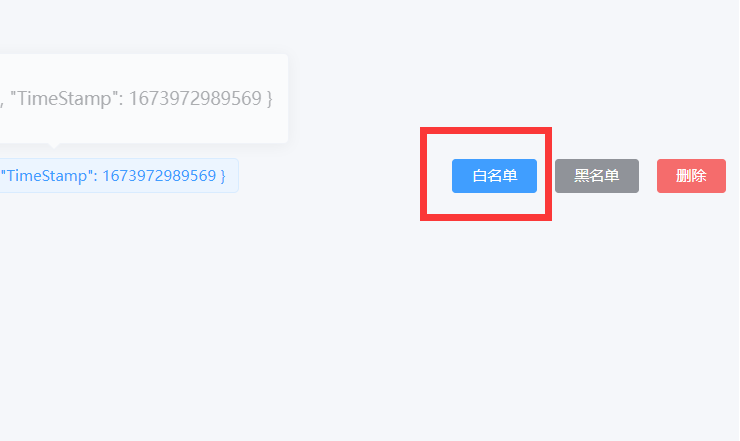
- Added image status display When the image management feature is enabled, you can view the current status of the image in the backend { "ListType": "None", "TimeStamp": 1673984678274 } ListType indicates whether the image is currently in the blacklist or whitelist. None means it's neither in the blacklist nor the whitelist, White means it's in the whitelist, Block means it's in the blacklist. TimeStamp is the timestamp when the image was first loaded. If image review API is enabled, the image review result will also be displayed here, identified by Label
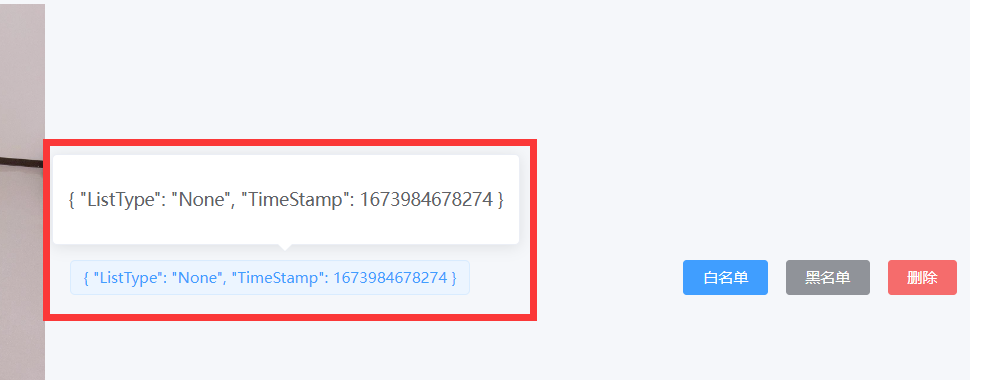
- Added blacklist feature When the image management feature is enabled, you can manually add images to the blacklist in the backend. Images on the blacklist will not load properly
- Added whitelist feature When the image management feature is enabled, you can manually add images to the whitelist in the backend. Images on the whitelist will always load properly, bypassing the image review API results
-
Added record deletion feature When the image management feature is enabled, you can manually delete image records in the backend, which means the image will no longer be displayed in the backend unless someone uploads and loads the image again. Note that since images are stored on telegraph's server, we cannot delete the originally uploaded images. We can only block image loading through the blacklist feature mentioned in point 6 above
-
Added program running mode: Whitelist mode When the image management feature is enabled, in addition to the default mode, this update also adds a new running mode. In this mode, only images added to the whitelist will be loaded. Uploaded images need to be approved before they can be displayed, which prevents inappropriate images from loading to the greatest extent. To enable, please set the environment variable: WhiteList_Mode=="true"
-
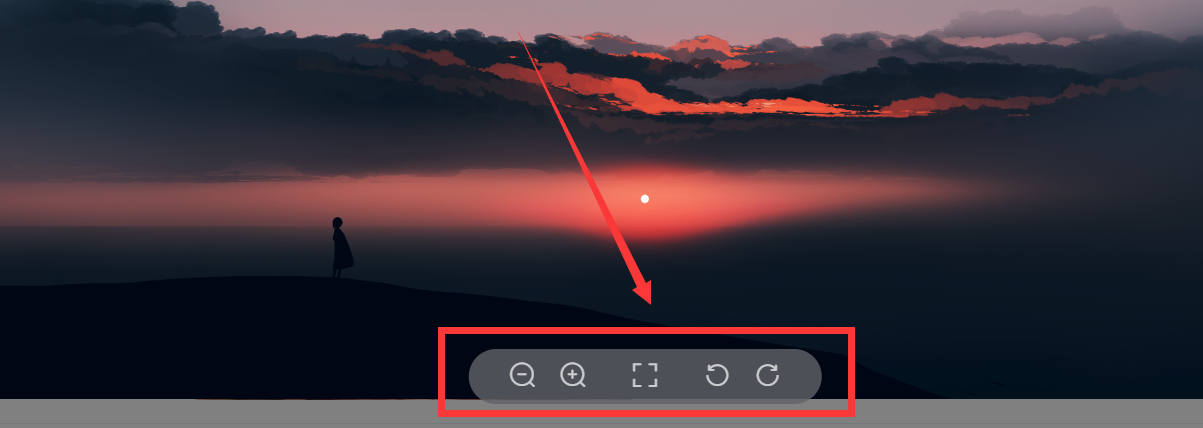
Added backend image preview feature When the image management feature is enabled, you can preview images loaded through your domain in the backend. Click on images to zoom in, zoom out, rotate, and perform other operations
Updating is actually very simple. Just refer to the update content above, first go to the Cloudflare Pages backend, set the required environment variables in advance and bind the KV namespace, then go to your previously forked repository on Github and select Sync fork->Update branch. After a while, Cloudflare Pages will detect that your repository has been updated and will automatically deploy the latest code
Cloudflare KV only has a free write quota of 1000 times per day. Each new image loaded will consume this write quota. If this quota is exceeded, the image management backend will not be able to record newly loaded images
Maximum of 100,000 free read operations per day. Each image load will consume this quota (when there is no cache. If your domain has cache enabled on Cloudflare, this quota will only be consumed when the cache misses). If exceeded, blacklist and whitelist features may fail
Maximum of 1,000 free delete operations per day. Each image record will consume this quota. If exceeded, you will not be able to delete image records
Maximum of 1,000 free list operations per day. Each time you open or refresh the backend /admin, it will consume this quota. If exceeded, backend image management will be affected
In most cases, the free quota is basically sufficient and can be slightly exceeded. It doesn't stop immediately when exceeded. Each quota is calculated separately. When a certain operation exceeds the free quota, only that operation will be suspended and will not affect other functions. That is, even if my free write quota is used up, my read and write functions are not affected, images can load normally, I just can't see new images in the image management backend.
If your free quota is not enough, you can purchase the paid version of Cloudflare Workers from Cloudflare yourself, starting at $5 per month, pay-as-you-go, without the above quota limitations
In addition, changes made to environment variables will take effect on the next deployment. If you changed Environment Variables to enable or disable a certain function, remember to redeploy.
This project is tested with BrowserStack.
This project is support by Cloudflare.